
Miniature Camping Tin

Today, I have the cutest and easiest craft for you! A miniature camping tin scene! I made this one for my boyfriend’s mom and she absolutely loved it! It was super easy to make too!
The most important thing about working with miniatures is having a good glue. In my experience, I have found that school glue or a glue gun just doesn’t stick well. I suggest a tacky craft glue. Personally, I use Beacon 3-in-1 Advanced Crafting Glue. But, there are multiple brands available.
You might have some of these supplies for the miniature camping tin already in your stash. The moss and the dried flowers can be purchased at your local Dollar Tree in the floral and craft sections. Sometimes, you can also find air-dry clay and quote stickers there as well. The buttons are readily available at craft stores, Walmart and online.
Ready to get started on your miniature camping tin?
Supplies
- 1 empty mint tin (e.g. Altoids tin or purchased at craft store)
- 1 package Dress It Up Hittin’ the Trail buttons
- 2-3 small twigs
- 1 piece wood/tree printed scrapbook paper
- 1 scrap sky paper either clouds or stars, your choice
- 1 scrap cobblestone or grass paper
- 1 small hunk floral moss
- 2-3 stems dried flowers, colors of your choice
- 1 pinch blue air-clay optional
- permanent marker
- sticker or printed words/verse of choice
- Pencil
- Glue
- Ruler
- Scissors
- Tweezers, optional
Directions
Background
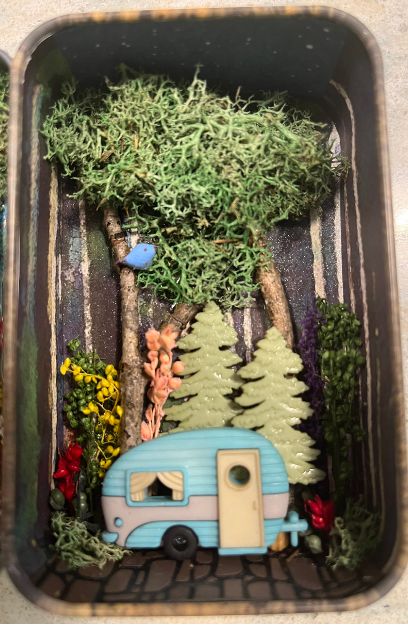
- Wash and dry the mint tin well.
- Using the mint tin as a pattern, trace the outside of the tin (both the cover and deeper part) onto the woodsy paper. Also trace the long side of both sides. Using scissors, carefully cut inside your drawn line about 1/4″. Don’t worry if it isn’t entirely perfect. We can cover it up with moss and flowers.
- Again, using the mint tin as a pattern, trace the bottom and top sides of the tin onto the sky and ground paper. Using scissors, carefully cut inside your drawn line about 1/4″.
- Check the fit of all the paper you cut, trimming, if necessary, before gluing.
- Spread glue in the deep section (bottom and sides) of the tin (see picture), carefully layer the sky and ground and smooth down. Next, layer the wood paper sides, covering up the edges of the sky and ground.
- Place the wood “back” in the tin. Press down until smooth.
- On the lid of the tin, spread glue and adhere the other piece of woodsy paper.
Setting the Scene
- Decide how you want your miniature camping tin to look – keep in mind that the tin might be closed at one point, so you want to make sure your items are not right against the edges of the lid, so it has room. Also check where any gaps need to be covered and be sure to plan for something to cover that area.
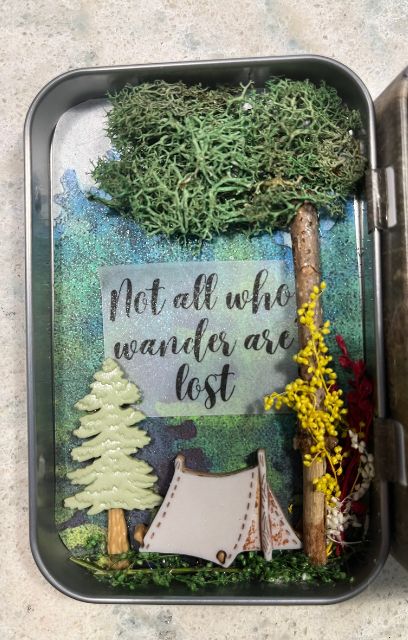
- Break the twigs, as needed, to make them fit the tin. Apply glue to the back of each stick and adhere to the tin. You may need to hold these a few minutes until the glue sets up enough to hold.
- Adhere the buttons in the tin where you want them. Some of the buttons have a shank on the back – you an cut this off with scissor or leave it. Leaving it makes it stick out in a 3D fashion. You might have to place something behind the button to stabilize it with the shank. I used small cut pieces of paper straws to hold the buttons steady.
Decorating the Miniature Camping Tin
- Take a small chunk of moss. Roll it around in your hand somewhat to make it look like a tree top. Place glue in your scene where your twigs stop. Adhere the moss to the glue. Again, you might have to press down and hold it until the glue sets up.
- Take small stems of the dried flowers and add to your scene where you want them. The easiest way it to place a little glue where you are putting the flowers and pressing down. Tweezers can help with the placement. You can also add small pieces of moss on the ground as bushes, if you want.
- Next, attach your quote sticker in the lid.
- Optional: take a small pinch of blue air-dry clay. Roll it into a little ball. With your fingers, gently form the tail of the bird. On the other end, using your fingernails, pinch a beak into the head. Allow to dry. When completely dry, use the permanent marker to make an eye, beak and any other markings you want. Glue into one of the trees in your scene.
Super easy, right?